Tools Reference
Complete reference for all tools in the pattern editor.
Selection Tools
Select Tool (V)
Primary tool for selecting and manipulating elements.
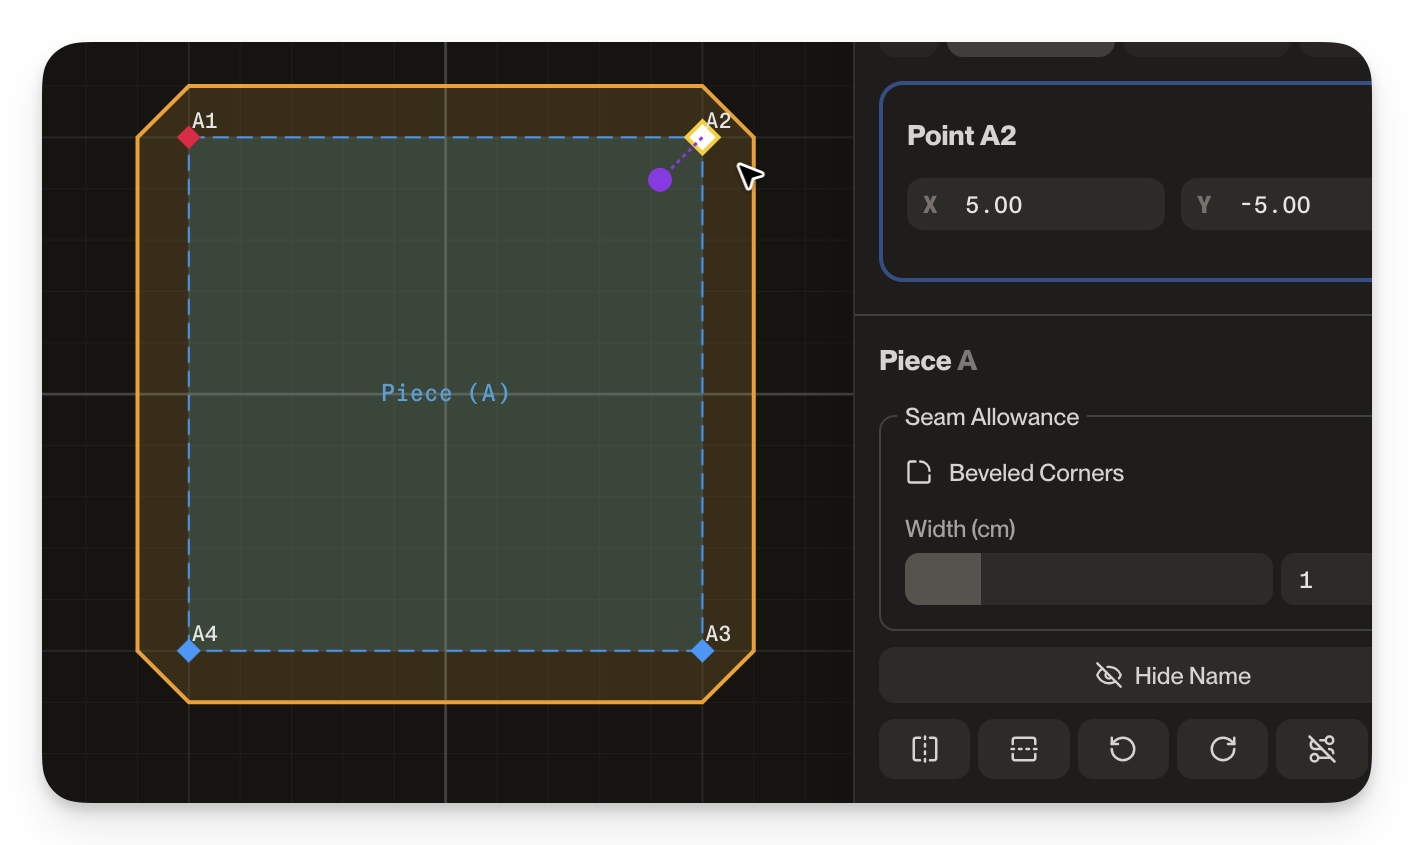
- Click to select points/shapes
- Drag to select multiple points (box selection)
- Click+drag selected points to move them
- Hold Option/Alt and click on a shape to duplicate it
- Hold Shift to switch to Transform tool
- Grid Snapping: Always uses fine grid (1cm/0.25inch) for moving
Multi-Select
- Hold Shift and click to add/remove from selection
- Select multiple shapes to move together
- Edit properties of multiple shapes at once
Transform Tool (M)
Move, scale, and rotate entire shapes with a visual transform box.
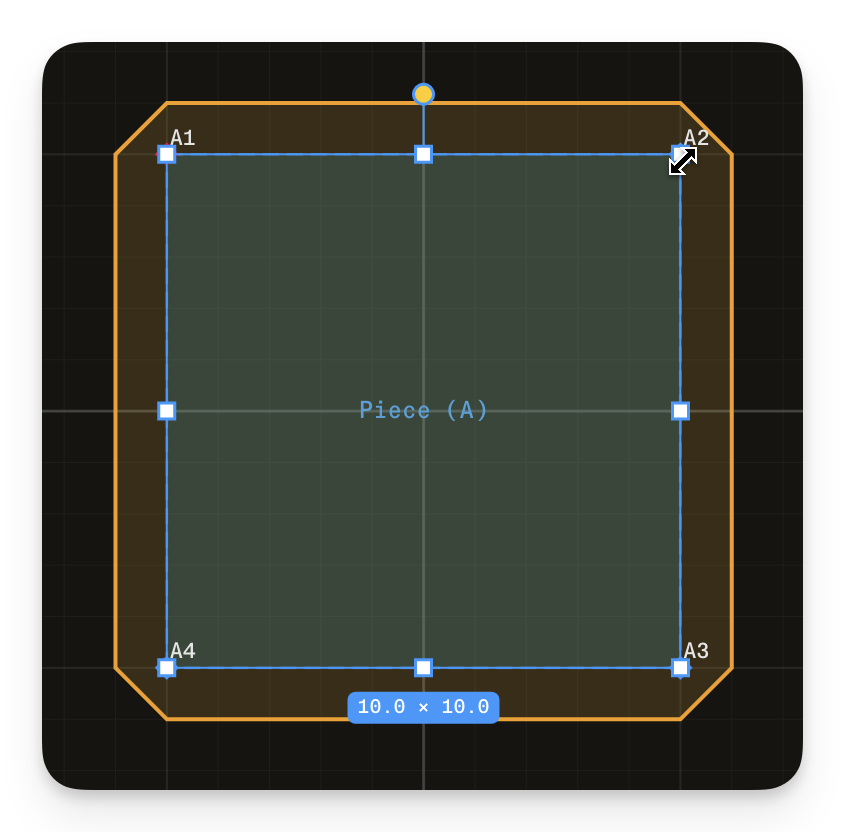
- Click and drag inside shape to move
- Drag corner handles to scale proportionally
- Drag edge handles to scale non-proportionally
- Drag rotation handle (above shape) to rotate freely
- Click outside a shape to switch back to Select tool
Modifier Keys
- Hold Shift while scaling corners for non-proportional scaling
- Hold Shift while rotating to snap to 45° increments
Transform Box
- Blue outline shows bounding box around selected shape(s)
- White square handles at corners and edges for scaling
- Circular handle with stem at top for rotation
- Dimensions label shows current width × height
Drawing Tools
Pen Tool (P)
Draw custom shapes by clicking to add points.
- Click to add straight line segments
- Click + drag to create bezier curves for smooth curves
- Close shape by clicking on the first point
- Hold Alt for quick access to Arc tool
- Grid Snapping:
- When zoomed out (large grid visible): snaps to 5cm/1inch grid
- When zoomed in (small grid visible): snaps to 1cm/0.25inch grid
Arc Tool (C)
Create curved lines by converting straight segments to arcs.
- Click on a line segment to select it
- Move cursor to adjust curve amount
- Click to confirm the curve
- Creates smooth curved edges between points
- Great for rounded corners and organic shapes
Add Point Tool (A)
Add new vertices to existing shapes.
- Click on any line to add a point
- New point appears at click location
- Allows adding detail to existing shapes
- Useful for refining shapes after initial creation
Remove Point Tool (E)
Delete vertices from shapes.
- Click on a point to remove it
- Surrounding lines automatically reconnect
- Cannot remove points if it would leave fewer than 3 points
- Helps simplify shapes
Shape Tools
Rectangle Tool (R)
Create rectangular shapes quickly.
- Click and drag to define rectangle
- Hold Shift for perfect squares
- Snaps to grid based on zoom level
- Ideal for panels and basic shapes
Circle Tool (O)
Create circular shapes.
- Click to set center point
- Move cursor to adjust radius
- Click again to create the circle
- Hold Shift for perfect circles
- Snaps to grid based on zoom level
Line Tool (L)
Create straight line segments (not closed shapes).
- Click to set start point
- Click again to set end point
- Creates a standalone line element
- Useful for grain lines and reference marks
- Can add text labels along the line
Editing Tools
Paint Brush Tool (B)
Assign fabrics to pattern pieces.
- Select a fabric in the Fabrics section of sidebar first
- Click on shapes to apply the selected fabric
- Changes fill color in Material Mode
- Helps visualize fabric placement
- Essential for multi-material projects
Notch Tool (N)
Add notch markers to pattern edges.
- Click on any line to add a notch marker
- Notches help align pieces during assembly
- Visible in both editor and exports
- Standard pattern-making alignment marks
- Multiple notches can be added to same line
Fold Line Tool (F)
Mark fold lines for 3D visualization.
- Click two points to create a fold line
- Defines how pattern folds in 3D mode
- Shown as dashed line on pattern
- Essential for 3D preview accuracy
- Multiple fold lines can exist per piece
Slice Tool (J)
Cut pattern pieces along custom lines to split them into separate shapes.
- Click on any two edges of a shape to define a slice line
- Hover over edges shows a sky-colored dot preview of where the cut point will be placed
- Multiple slice lines can be added to a single shape
- Slice endpoints can be placed on other existing slice lines (e.g., from a corner to the center of another slice)
- Supports curved edges and bezier lines
- Slice lines turn yellow on hover with the select tool
- Slice endpoint dots can be dragged along their edge to reposition them
- Click "Slice Shape" in the sidebar to execute all slice lines at once
Slice Settings (Sidebar)
- Start/End position sliders (0–100%) with variable support for each slice line
- Delete individual slice lines
- Color-coded region preview shown on canvas with complementary Tailwind colors
- Slice names: rename each resulting piece before slicing
- Sliced pieces are automatically grouped under the original shape name
- Slice lines are shown on both active and inactive shapes
Dart Tool (D)
Add dart markers to pattern pieces for shaping.
- Click on any line/edge to place a dart
- Dart width and depth adjustable in sidebar
- Darts fold in 3D view when dart fold is enabled
- Multiple darts per shape supported
- Dart positions can be adjusted by dragging
Seam Allowance Tool (S)
Add and adjust seam allowances on pattern edges.
- Click edges to select them for seam allowance adjustment
- Double-click an edge to exclude/include it from seam allowance
- Per-edge seam allowance width in sidebar
- Global seam allowance can be set on the shape
- Visual preview shows the allowance offset
Measure Tool (U)
Measure distances between points on the canvas.
- Click two points to measure the distance between them
- Snaps to shape points for precision
- Press Escape to clear all measurements
- Displays measurements in current unit (cm/in)
Hardware Tools
Webbing / Strap Tool (Y)
Draw webbing straps and hardware attachment points on pattern pieces.
- Click to place strap waypoints along desired path
- Double-click or press Enter to finish the strap
- Click an existing strap to select it
- Adjustable strap width in sidebar
- Material types: webbing, grosgrain, elastic, daisy-chain, binding
- Add stitch marks (bartack, box-x, straight) along the strap
- Fold ends for hardware attachment loops
- Assign fabrics for color/texture
Cord / Elastic Tool (Q)
Draw cord and elastic routing paths through hardware points.
- Click to place cord guide/anchor points
- Double-click or press Enter to finish
- Cord follows a smooth catenary curve between points
- Adjust global tension (0 = fully slack, 1 = fully taut)
- Per-segment tension overrides available
- Cord types: shock-cord, paracord, drawcord, elastic, bungee
- Adjustable thickness (mm) and color
- Closed loop option for continuous cord runs
Tent Pattern Generator
Generate tent and shelter pattern pieces from parametric dimensions.
- Select base shape: Triangle, Rectangle, Pentagon, or Hexagon
- Set width, length, and apex height
- Adjust apex position (X/Y percentage)
- Interactive plan view with draggable corners and apex
- 3D preview of the tent shape
- Flat pattern preview showing all unfolded panels
- Generates floor + panel pieces with correct connections
- Panel-to-panel ridge connections for sewing
- Auto-computes 3D vertex positions for accurate tent preview
Fabric Drape
Add realistic fabric billow to the 3D preview. Toggle in the 3D viewer (bottom-left button) or set per-shape in Sidebar → 3D Settings.
- Global slider (1–100) controls drape intensity for all shapes
- Per-shape override: set individual pieces flat (0) or custom amount
- Edges stay flush at seams; only interior fabric billows
- Multi-scale noise creates organic wrinkles, not a single smooth bulge
- Group children, zippers, and hardware follow the draped surface automatically
See Piece Properties → Fabric Drape for full details.
Annotation Tools
Text Tool (T)
Add text labels to your pattern.
- Click on canvas to create a text box
- Type directly in the WYSIWYG editor
- Drag the grip handle (left) to move text
- Drag the resize handle (right) to set fixed width
- Double-click resize handle to auto-fit width to text
Text Options :
-
Font size: H1, H2, Subtitle, Body, Caption
-
Font family: Sans or Mono
-
Color: Auto (theme-dependent), or choose from palette
-
Opacity: Adjustable transparency
-
Text alignment: Left, Center, Right
-
Rotation: Rotate in 45° increments
-
Multiline text supported
-
Text appears in exports (SVG, PDF)
Comment Tool (K)
Add collaboration notes and annotations.
- Click to place comment marker
- Edit text content in popup
- Toggle visibility in preview mode
- Lock/unlock to prevent accidental editing
- Useful for construction notes and reminders
- Includes timestamp and username
Image Tool (I)
Add reference images to your pattern.
- Click to upload and place an image
- Drag corners to resize
- Drag to reposition
- Upload images to trace or reference
- Useful for converting sketches to patterns
Tool Tips
Grid Snapping
Most drawing tools snap to grid:
- Coarse grid (5cm/1inch) when zoomed out
- Fine grid (1cm/0.25inch) when zoomed in
- Hold Shift while drawing to disable snapping temporarily
Tool Switching
- Use keyboard shortcuts for fastest tool switching
- Click dropdown arrows in toolbar to access grouped tools
- Recently used tool in each group appears as main button
- Tool settings persist between switches
Mobile Usage
- Some tools have simplified behavior on touchscreens
- Bezier editing uses dedicated buttons on mobile
- Preview lines may be hidden on mobile for clarity
- Long-press gestures enable additional functions
Keyboard Shortcuts
Quick reference for all tool shortcuts:
| Tool | Shortcut | Icon |
|---|---|---|
| Select | V | |
| Transform | M | |
| Pen | P | |
| Arc | C | |
| Add Point | A | |
| Remove Point | E | |
| Rectangle | R | |
| Circle | O | |
| Line | L | |
| Paint Brush | B | |
| Notch | N | |
| Fold Line | F | |
| Dart | D | |
| Slice | J | |
| Seam Allowance | S | |
| Measure | U | |
| Webbing | Y | |
| Cord | Q | |
| Text | T | |
| Comment | K | |
| Image | I |
Related Features
- Point Editing - Advanced point manipulation techniques
- Piece Properties - Configure shape settings
- Material Mode - Visualize fabric assignments
- 3D Mode - Preview with fold lines